If your laptop screen shows vertical lines, flickering bars, or strange color bands out of nowhere, you’re not alone.
This frustrating issue is increasingly common among users of all major brands, including HP, Dell, Lenovo, Acer, Asus, and others.
Whether it’s faint white lines, bold vertical stripes, or a distorted display, this visual glitch can make your laptop nearly unusable—and it rarely goes away on its own.
These vertical lines on your laptop monitor often point to hardware or software malfunction.
On the hardware side, a faulty LCD panel, damaged display cable, or GPU-related failure could be the root of the problem.
On the software side, you might be dealing with corrupted graphics drivers, incorrect screen resolution settings, or even BIOS-level bugs that disrupt how your laptop renders the display output.
This guide explains the real-world causes of your laptop screen’s lines and offers practical, step-by-step solutions to help you diagnose and fix the problem yourself—without needing to replace your device outright.
What Causes Vertical Lines on a Laptop Screen?
When your laptop screen shows vertical lines, it’s a clear sign of a display issue—but the underlying cause isn’t always easy to spot at first glance.
These lines might be thin or thick, black or multicolored, static or flickering.
In some cases, they’re accompanied by screen artifacts, colored vertical lines, or even white horizontal stripes running across the display.
To properly fix the problem, it’s important to understand whether you’re facing a hardware failure or a software-related glitch.
Below are the most common reasons why your laptop monitor shows vertical lines, based on both physical faults and software malfunctions.
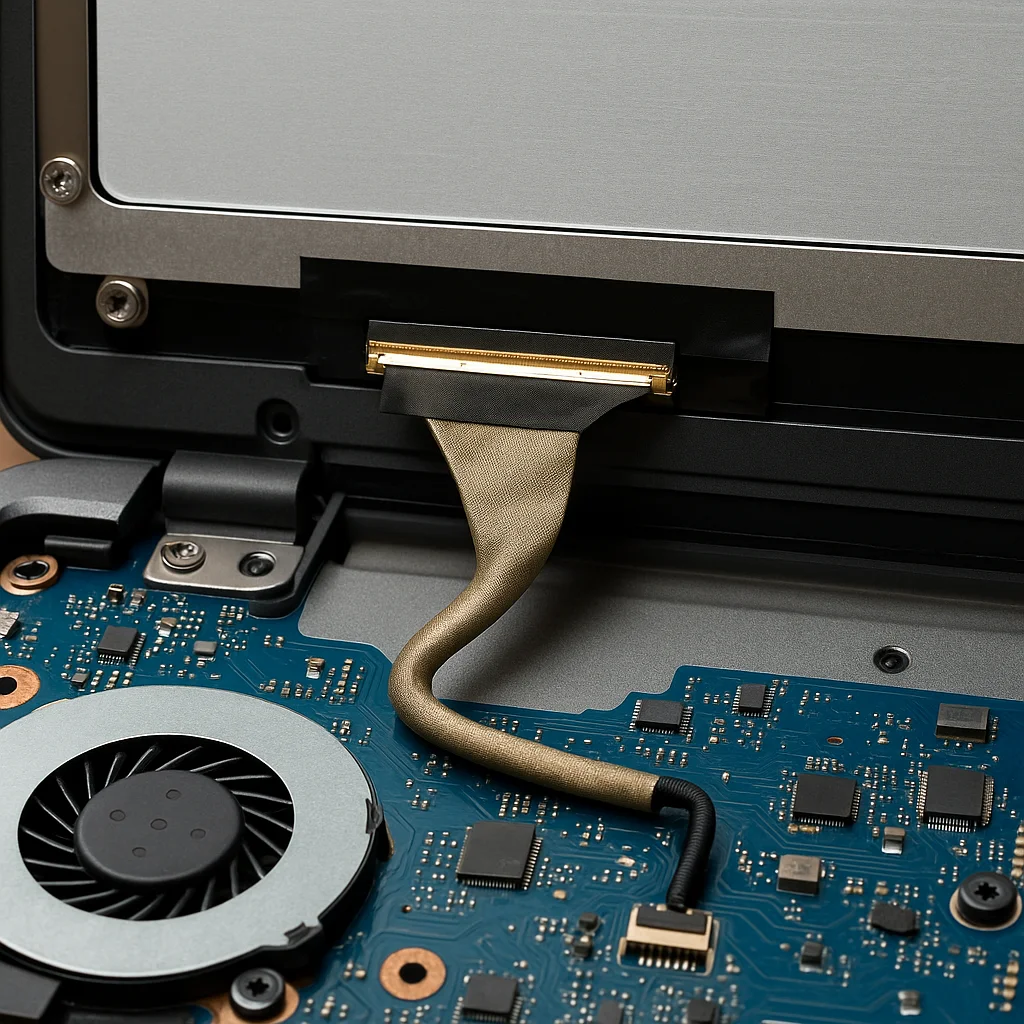
One of the most frequent hardware-related causes is a damaged or loose ribbon cable, also known as a flex cable, which connects your laptop’s motherboard to the screen.
If this cable becomes loose or frayed often from repeated lid movement or physical impact—it can interfere with the signal between the GPU and the display panel, resulting in flickering lines or broken visuals.
Another key culprit is a faulty GPU or integrated display controller.
This is more common in older laptops or devices that have experienced overheating.
When your graphics rendering system begins to fail, it often shows up first through colored vertical lines or abnormal banding patterns on the screen.
Physical damage can manifest as dead pixels or screen pressure damage, where excessive force or a drop has caused internal cracks or distortion in the LCD panel.
This typically presents as permanent vertical or horizontal lines on your laptop monitor that do not go away.
On the software side, outdated or corrupted graphics drivers are a leading source of display malfunction.
If you’ve recently updated your System, installed new software, or experienced a sudden crash, the display driver conflict could be causing the issue.
Inconsistent screen resolution settings or incorrect refresh rate configurations may lead to screen artifacts and misaligned lines.
Less frequently, issues like BIOS misconfiguration, magnetic interference from nearby electronic devices, or system overheating can also disrupt display output and create vertical or horizontal lines on your screen.
Understanding whether you’re dealing with a hardware or software problem is the first step to fixing it, and in the next section, we’ll walk you through exactly how to do that.
Troubleshooting Checklist – Diagnose the Problem Quickly
Before diving into complex repairs or assuming the worst, it’s crucial to run a few quick checks to determine the root cause behind why your laptop screen shows vertical lines.
In many cases, you can narrow down whether the issue is due to a failing GPU, a loose display cable, or a driver conflict by observing how and when the problem appears.
The table below will help you quickly assess the most common symptoms of vertical or horizontal lines on your laptop monitor, match them with their likely causes, and apply practical fixes.
This fast-track method prevents unnecessary troubleshooting and saves time.
| Symptom | Likely Cause | DIY Fix |
|---|---|---|
| Lines appear during boot or BIOS screen | Faulty GPU | Connect to external monitor |
| Lines only show up in Windows environment | Driver conflict | Reinstall or update display driver |
| Lines change when moving laptop lid | Loose or damaged cable | Reseat or replace display connector |
| Colored vertical lines across entire screen | Broken LCD panel | Screen replacement recommended |
| Horizontal flickering lines during video | Refresh rate/resolution | Adjust display settings |
| Lines vanish in Safe Mode | Software issue | Perform clean boot or malware scan |
| Lines appear only after extended use | Overheating | Clean vents, improve airflow |
| White lines across top or bottom | Screen pressure damage | Inspect LCD for damage or cracks |
This checklist aligns with key NLP entities like display issues, screen artifacts, output signal disruption, and graphics rendering.
It also touches on lexical variants like colored vertical lines and white lines across computer screens while addressing semantic entities such as faulty GPU, loose display cable, BIOS error, and driver conflict.
This approach not only empowers users to self-diagnose based on observable symptoms but also increases the likelihood of solving the issue without professional intervention—especially when the problem is tied to software misconfiguration or hardware looseness.
How to Fix Vertical Lines on a Laptop Screen (Step-by-Step)
If your laptop screen shows vertical lines, the best approach is to follow a structured series of troubleshooting steps that help identify whether the issue is tied to the screen itself or deeper within the System, such as the graphics card, display cable, or driver software.
Below are the most effective methods, from basic external checks to deeper hardware or driver-level fixes.
Step 1 – Connect to an External Monitor
Using an external display is the first step in diagnosing whether the vertical lines on your laptop monitor are due to the internal LCD panel or a failing GPU.
Connect your laptop to an external monitor or TV using an HDMI, VGA, or USB-C port.
If the external screen displays everything correctly, the issue likely lies with the laptop screen, not the GPU.
But if the same colored vertical lines, screen flickering, or distortion appears on both screens, it could indicate a graphics card failure or a motherboard-related problem.
You can also take a screenshot while the lines are visible.
If the screenshot shows clean output (no lines), that confirms the issue is isolated to the display hardware—typically the LCD panel or cable—and not with the GPU or rendering process.
Step 2 – Reseat or Replace the Display Cable
If the lines flicker or change when you open or close the lid, you may be dealing with a loose internal connector or a damaged flex cable.
This cable connects the motherboard to the screen, and over time, repeated motion or even slight drops can loosen or damage it, resulting in intermittent display issues.
To fix this, you’ll need to:
- Power off the laptop completely.
- Disassemble the bezel and access the screen assembly.
- Locate the ribbon/flex cable and gently disconnect and reconnect it to ensure it’s seated properly.
- Inspect for any signs of physical wear or fraying.
If you find the cable is damaged, it should be replaced. OEM replacements are available for most brands and are relatively affordable.
Step 3 – Update or Reinstall Display Drivers
If your laptop screen started showing vertical lines after a Windows update, driver crash, or new software installation, it’s likely a driver-level issue.
Outdated or corrupted graphics drivers can interfere with display output, creating screen artifacts, distorted visuals, or incorrect resolution settings.
You can fix this by:
- Opening Device Manager
- Expanding Display adapters
- Right-clicking your GPU and selecting Update driver
- Choosing either Search automatically or manually install the latest version from the manufacturer’s support page (NVIDIA, Intel, AMD)
Alternatively, if updating doesn’t solve the problem, uninstall the current driver and restart your System. Windows will typically reinstall a working default driver upon reboot.
Step 4 – Adjust Resolution and Refresh Rate
If your laptop screen shows vertical lines or other visual issues like stretching, flickering, or screen artifacts, incorrect display resolution or refresh rate settings might be the cause.
This is especially common when the laptop has recently been connected to an external monitor or has undergone a software update that reset display configurations.
Navigate to your System’s display settings by right-clicking on the desktop and selecting Display settings (on Windows).
Ensure the recommended resolution matches your screen’s native resolution.
If you’re seeing colored vertical lines or distortion, change the refresh rate by clicking on Advanced display settings and selecting a stable value (usually 60Hz for most laptops).
Mismatched resolution and refresh settings can lead to output signal disruption, misalignment, or horizontal flickering lines—especially on older LCD panels or when using integrated graphics.
Correcting these values can often resolve the issue without needing hardware replacement.
Step 5 – Boot in Safe Mode or Clean Boot
Software conflicts, third-party apps, or even malware can sometimes interfere with how your graphics rendering behaves. Booting into Safe Mode allows your System to load only essential drivers and processes, isolating the issue and ruling out software-based causes.
To enter Safe Mode:
- Restart your system and press F8 (or Shift + Restart from the login screen).
- Choose Safe Mode with Networking if you want internet access for updates or diagnostics.
If the vertical lines on your laptop monitor disappear in Safe Mode, you’re likely dealing with a driver conflict, malware infection, or a faulty third-party app.
Performing a clean boot—which turns off all non-Microsoft startup items—can help identify the program causing display interference.
These techniques effectively resolve display issues that don’t originate from hardware failure, especially if the symptoms develop gradually or coincide with software changes.
Step 6 – Run Built-In Diagnostics
If none of the above steps provide clarity, running your laptop’s built-in diagnostic tools can help confirm whether a hardware fault, such as a damaged GPU, memory error, or failing display panel, is present.
Most major laptop manufacturers offer diagnostic utilities:
- HP: Use HP PC Hardware Diagnostics (F2 on boot)
- Dell: Use SupportAssist or Dell’s built-in ePSA diagnostics
- Lenovo: Use Lenovo Vantage for full system scans
For a universal tool, Windows Memory Diagnostic can be run by searching “Windows Memory Diagnostic” in the Start menu and rebooting into a memory scan.
This is especially helpful if the issue is related to screen artifacts or if your System becomes unstable after showing white lines across the computer screen.
Running these tests provides clear feedback on whether the vertical or horizontal lines on your laptop screen result from internal component degradation or something that can still be fixed through software tuning.
Step 7 – Reset BIOS/UEFI
If your laptop screen shows vertical lines even during startup or in the BIOS interface, the issue may stem from corrupted firmware-level settings.
The BIOS (or UEFI on newer systems) controls core hardware behavior, including how your graphics and display components initialize.
A misconfigured BIOS can result in improper graphics rendering, which may cause screen artifacts, output signal disruption, or colored vertical lines.
To reset the BIOS or UEFI to factory defaults:
- Restart your laptop and press the designated BIOS key (usually F2, F10, DEL, or ESC, depending on the brand).
- Once inside the BIOS/UEFI interface, look for an option like “Load Setup Defaults” or “Reset to Default Settings”.
- Save and exit the BIOS, then reboot the System.
Resetting your BIOS clears any display-related misconfigurations that might interfere with your laptop monitor.
This step is especially relevant if you’ve recently updated the BIOS, changed hardware settings, or installed dual-boot operating systems.
Step 8 – System Restore or OS Reinstall (Last Resort)
If all previous methods have failed to fix the vertical lines on your laptop screen, and you’ve ruled out GPU and cable-related issues, it may be time to consider a System Restore or a complete OS reinstall.
A System Restore can restore your system settings and drivers before the issue begins. This is ideal if the problem starts after a software update, third-party app installation, or driver change.
To perform a System Restore:
- Type “Create a restore point” in the Windows search bar.
- Open the System Properties window and click System Restore.
- Choose a restore point that predates the appearance of the lines.
If no restore point is available or the issue persists, a full reinstallation of Windows using a recovery partition, bootable USB, or backup image may be necessary.
This process will reset all system files and configurations, often resolving persistent driver conflicts, malware-related issues, or display driver corruption that causes screen glitches, flickering lines, or horizontal lines on the screen.
Before performing a reinstall, back up all important files and ensure you have access to your System’s recovery media or partition.
Horizontal Lines or White Stripes? Here’s What They Mean
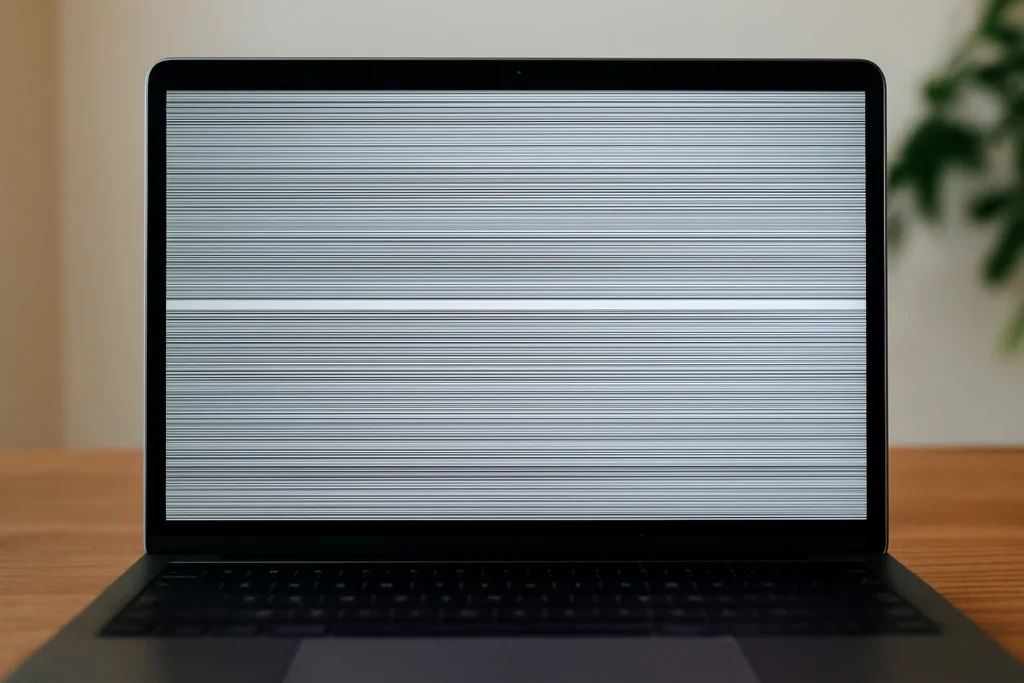
If you’ve noticed white horizontal lines across your laptop screen or thin stripes flickering intermittently, the issue may not be limited to vertical lines alone.
Horizontal screen lines are often an indication of a different underlying problem—sometimes visual, sometimes hardware-related—and require a slightly adjusted approach when troubleshooting.
These horizontal artifacts may appear at the top, bottom, or across the screen. They might be static or shift position based on-screen activity, such as during scrolling or video playback.
In some cases, they’re subtle and easy to ignore, while in others, they cause display corruption or interfere with readability altogether.
Several common issues can trigger these screen-tearing effects and horizontal glitches:
One potential cause is screen burn-in, where static elements displayed for long periods leave a semi-permanent shadow on the LCD panel.
Although rare on modern laptops, it can happen on older screens that consistently show fixed content.
Another frequent culprit is cable misalignment, especially if the internal flex cable is slightly loose or bent near the hinge area.
This can disrupt horizontal data transmission to the panel, causing visible white lines, flickering stripes, or color distortion.
Sometimes, a resolution mismatch or incorrect refresh rate setting can distort the pixels drawn on the screen, especially when switching between displays or after a recent OS update.
This is particularly common in laptops connected to external monitors or used with docking stations.
Lastly, GPU overheating is a critical but often overlooked cause.
When the graphics processing unit runs at high temperatures for extended periods, it can affect rendering accuracy and stability, leading to vertical and horizontal screen artifacts.
If you’re experiencing horizontal lines on your laptop monitor, it’s important to observe when and how they appear.
Do they show up during boot? Only during video playback? Or do they disappear in Safe Mode? These behavioral patterns offer critical clues about whether you’re facing a hardware degradation issue or a software conflict.
How to Know If It’s the GPU or the LCD Screen
When your laptop screen shows vertical lines, one of the most critical steps in troubleshooting is determining whether the issue is with the LCD screen itself or the GPU (graphics processing unit).
Misdiagnosing the root cause can lead to unnecessary repairs or even replacing the wrong component.
Both hardware components—your internal display panel and your graphics processor—can produce similar visual symptoms, such as output signal disruption, colored vertical lines, or screen flickering.
A precise diagnostic approach is essential to isolate the failure point.
Here’s how you can tell the difference using practical, low-cost methods:
1. Test with an External Monitor
Connect your laptop to an external display using HDMI, VGA, or USB-C.
If the external monitor works without any vertical lines, screen artifacts, or horizontal tearing, the problem most likely lies in the LCD panel or internal display cable.
However, if the same distortion appears on both screens, it indicates a faulty GPU or motherboard-related issue.
This step confirms if your internal display produces corrupt visuals due to panel-level damage, such as from drops, flex pressure, or loose ribbon cables.
2. Use the Screenshot Method
Take a screenshot while the lines are visible on your laptop screen.
Open that screenshot on a different device or external monitor.
If the screenshot appears clean (without any lines), this confirms the GPU is functioning properly, and the damaged LCD panel is the source of the distortion.
But if the screenshot also shows lines, bands, or distortion, that points toward a rendering problem with the GPU or driver layer, confirming that the graphics output is already corrupted before reaching the screen.
3. Observe the BIOS or Boot Screen Behavior
Lines appearing during boot—before Windows loads—can provide clear indicators.
The BIOS screen uses minimal graphics rendering and bypasses OS-level drivers.
If the lines appear even in the BIOS or UEFI screen, you’re likely dealing with a hardware-level failure, either from a faulty GPU or a damaged cable/display interface.
Conversely, if the BIOS screen is clean but lines appear only after Windows starts, the issue may be driver-related or tied to your OS settings, such as screen resolution or refresh rate mismatches.
By combining these three methods—external monitor testing, the screenshot method, and BIOS observation—you can confidently narrow down whether the issue lies with the graphics processor or the laptop screen itself.
When You Should Replace the Screen or GPU
If your laptop screen shows vertical lines consistently even in BIOS, Safe Mode, and on external displays it’s often a sign that a full component replacement is necessary.
While many display issues can be resolved through settings adjustments, cable reseating, or driver fixes, some problems point to irreversible hardware failure in the LCD panel or the GPU.
1. Persistent Lines Across All Screens
If the lines are visible across every output your laptop’s screen, an external monitor, and during boot—it’s unlikely to be a software issue.
This widespread display distortion typically indicates a faulty GPU or motherboard-level graphics failure.
These issues can’t be resolved through software and usually require a GPU replacement or, in some models, a full motherboard swap since many laptops use integrated graphics.
2. Cracked Screens or Visible Liquid Damage
Sometimes, the root cause is obvious. A cracked screen, visible discoloration, or white lines across the computer screen caused by liquid exposure are strong signs of a damaged LCD panel.
In such cases, visual glitches like colored vertical lines or horizontal tearing often worsen and cannot be repaired through software fixes or cable reseating.
Replacement is the most cost-effective solution.
3. Signs of GPU Failure
Your graphics chip may be failing if you experience the following:
- Sudden System crashes during video rendering or gaming
- High internal temperatures despite average use
- Fans are spinning loudly or continuously.
- Display artifacts, screen glitches, or flickering lines that persist even on an external monitor
These symptoms, combined with output signal disruption, usually mean your graphics processor cannot handle rendering tasks.
If this happens outside the warranty period, it’s best to evaluate the cost of GPU replacement versus a new laptop.
4. Estimated Replacement Costs
Here’s a general idea of what replacement might cost:
- Laptop LCD screen replacement: ₹2,500 to ₹8,000 INR (depending on size and resolution)
- Dedicated GPU or motherboard replacement: ₹7,000 to ₹20,000 INR or more, depending on brand and model
Costs can vary based on laptop model (HP, Dell, Lenovo, Acer, Asus), screen type (IPS, OLED, TN), and whether you use an authorized service center or third-party repair shop.
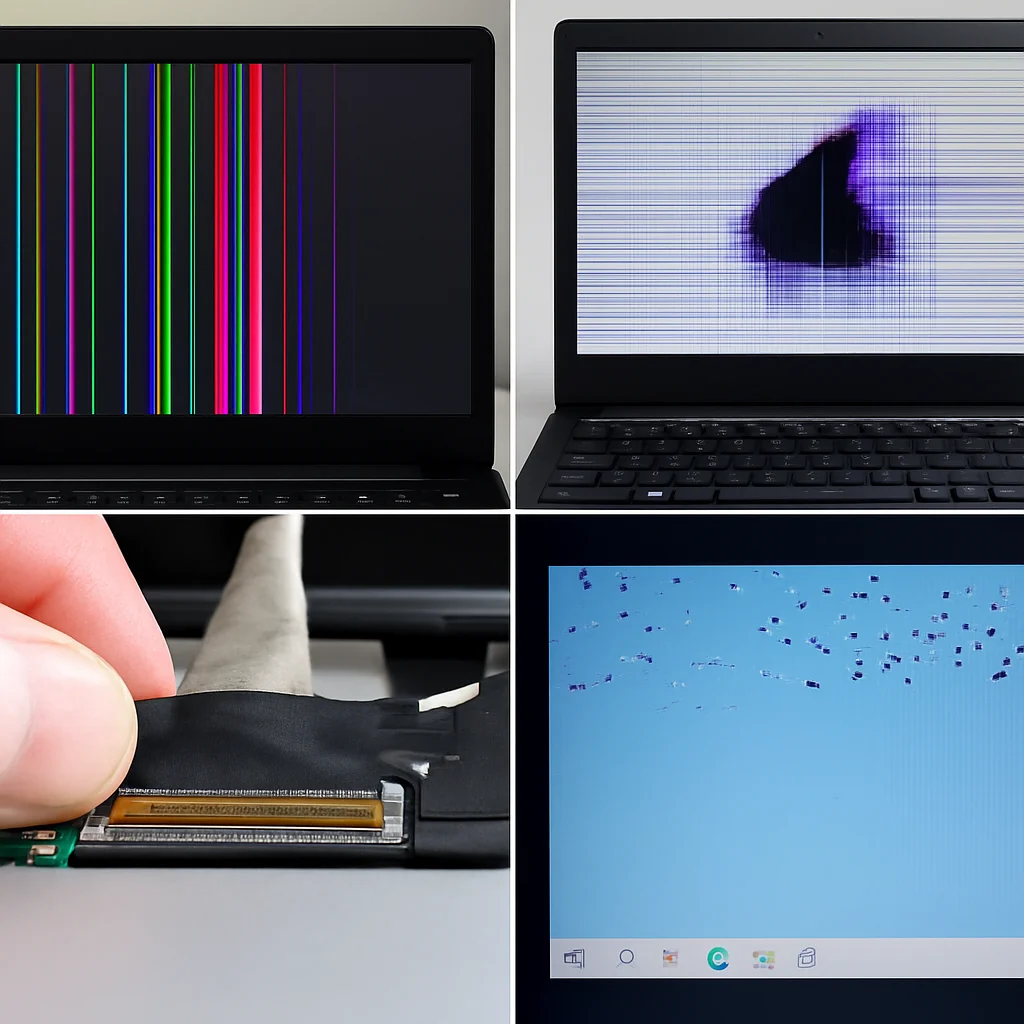
Visual Guide – Common Line Patterns & What They Mean
Understanding the visual symptoms on your screen can significantly narrow down the cause behind why your laptop screen shows vertical lines or other forms of distortion.
These patterns aren’t just random glitches—they’re clues that point directly to specific hardware faults or display disruptions.
This visual guide explains the most common line-based anomalies seen on laptop screens and how to interpret them.
Recognizing these patterns will help you determine whether you’re dealing with a damaged LCD panel, flex cable issue, or GPU rendering failure.
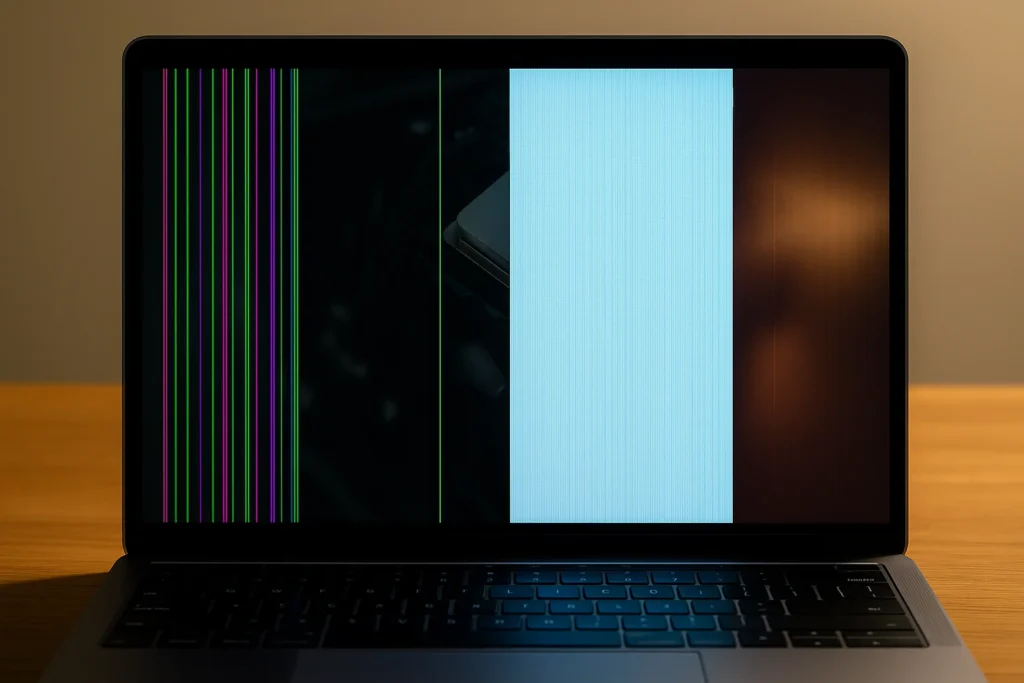
1. Vertical Colored Lines Across the Screen
If your screen shows green, red, or blue vertical lines, especially in consistent patterns or columns, it’s often a sign of a damaged display connector or broken LCD matrix.
These lines usually appear in fixed positions and may fade or intensify with screen movement.
2. LCD Pressure Damage
An impact or constant pressure against the display can lead to internal cracks, even without visible glass breakage.
This shows up as black blotches, color bleeding, or horizontal and vertical screen artifacts, often expanding over time.
3. Flex Cable or Connector Fault
When your laptop monitor shows vertical lines that change while moving the screen lid, it’s likely due to a loose flex cable.
These cables transmit display data from the motherboard to the screen and can wear out over time.
4. GPU Artifacting
If your screen is showing pixel scatter, flickering boxes, or scrambled display data, this often points to graphics rendering failure or GPU overheating.
These issues are common in aging laptops or those with inadequate thermal management.
Each image in this guide is meant to provide a visual context for the kind of display problem you may be encountering.
If you recognize one of these patterns on your device, you’ll have a clearer idea of whether to update a driver, reseat a connector, or consider hardware replacement.
Prevention Tips – Avoid Future Screen Glitches
Once you’ve resolved the issue where your laptop screen shows vertical lines, taking the right precautions can help you avoid similar problems.
Screen glitches—whether colored vertical lines, horizontal flickering, or full display artifacts—often result from preventable wear and tear, power fluctuations, or configuration conflicts.
Below are some of the most effective practices to protect your laptop from display issues, hardware stress, and unnecessary component damage.
1. Use Your Laptop on Stable, Flat Surfaces
Avoid placing your laptop on uneven or soft surfaces that cause flexing or heating issues.
Prolonged use on beds, laps, or pillows may block ventilation and strain internal connections like the flex cable, increasing the risk of screen artifacts or intermittent line glitches.
2. Close the Lid Without Applying Pressure
Applying too much pressure while closing the lid can create stress points on the LCD panel, resulting in white lines across the screen or even internal cracks.
Always close your laptop gently, and avoid stacking items on top of it during storage or travel.
3. Use Certified Chargers and Avoid Overcharging
Using third-party or incompatible chargers may cause power surges or voltage inconsistency.
These can damage the graphics rendering system or cause long-term GPU overheating.
Always use an original or certified charger and unplug the device to prevent battery stress when fully charged.
4. Keep Drivers and Operating System Updated
Many issues related to screen tearing, refresh rate mismatches, or display corruption stem from outdated drivers.
Make it a habit to regularly update your graphics drivers, BIOS, and OS. This ensures compatibility with newer applications and prevents display output disruption caused by software conflicts.
5. Use a Surge Protector
Electrical surges can instantly damage the motherboard, GPU, or display connectors.
Using a high-quality surge protector while charging your laptop, especially during thunderstorms or in areas with unstable power supply, is a simple step that prevents costly repairs.
6. Avoid Exposure to Magnets or Strong Electromagnetic Fields
Magnets can interfere with your laptop’s display components, especially on older models with magnetic lid sensors or weak shielding.
Protecting your computer from speakers, magnetic stands, or industrial machinery helps avoid unintended screen flickering or panel misbehavior.
Following these precautions consistently will help you prevent minor screen glitches and major failures, such as damaged LCD panels or faulty GPUs.
It’s far more efficient—and affordable—to maintain your device well than to troubleshoot or replace critical hardware after failure.
Brand-Specific Troubleshooting Tips (HP, Dell, Lenovo, etc.)
While general methods can help resolve when your laptop screen shows vertical lines, each brand often provides its own built-in diagnostics and recovery tools.
These manufacturer-specific utilities can speed up troubleshooting, especially when dealing with screen artifacts, flickering lines, or potential hardware faults like a damaged LCD panel or a faulty GPU.
Using these tools allows you to quickly identify whether the issue stems from hardware or software without disassembling the laptop or installing third-party applications.
1. HP Laptops: Use HP PC Hardware Diagnostics (F2 Key)
If you’re using an HP device and encountering vertical lines on the monitor, restart your System and tap the F2 key repeatedly during boot to enter HP’s pre-boot diagnostic environment.
From there, run the Display and Component Tests to check the screen, memory, and graphics controller.
These diagnostics are useful for isolating issues related to output signal disruption, GPU rendering errors, and display connector faults.
HP’s tools also let you generate a hardware failure ID, which you can use when contacting support.
2. Dell Laptops: Use Dell SupportAssist or ePSA
Dell laptops come with SupportAssist, a pre-installed diagnostic utility.
You can run it by searching for SupportAssist in the Start menu. Alternatively, reboot the System, press F12 to access the boot menu, and then choose Diagnostics to run ePSA Pre-boot tests.
If your Dell laptop screen shows vertical or horizontal lines, these tools will scan for display artifacts and GPU errors and even report if a component like the LCD cable is malfunctioning.
Dell’s diagnostics also highlight BIOS issues that may contribute to screen flickering or resolution glitches.
3. Lenovo Laptops: Use Lenovo Vantage or Boot Diagnostics
For Lenovo users, open the Lenovo Vantage app, which comes pre-installed on most models. Under the “Device” or “Hardware Settings” tab, you’ll find options to run a Display and Graphics Test and check for firmware or driver updates.
If you can’t access Windows, restart and press F10 or Enter, then select Diagnostics from the boot menu.
Lenovo’s suite is particularly good at detecting flex cable problems, panel faults, and GPU overheating, common triggers for colored vertical lines or white lines across the laptop screen.
These built-in tools are reliable first steps before considering hardware replacement or OS reinstallation.
They also generate useful error codes and logs that simplify communication with the brand’s support team.
If you’re unsure which test to run, start with the Display, Video Card, or Graphics Controller diagnostics.
These align directly with users’ issues when the laptop screen has vertical lines or horizontal screen tearing.
Best Tools & Accessories for Screen Diagnostics
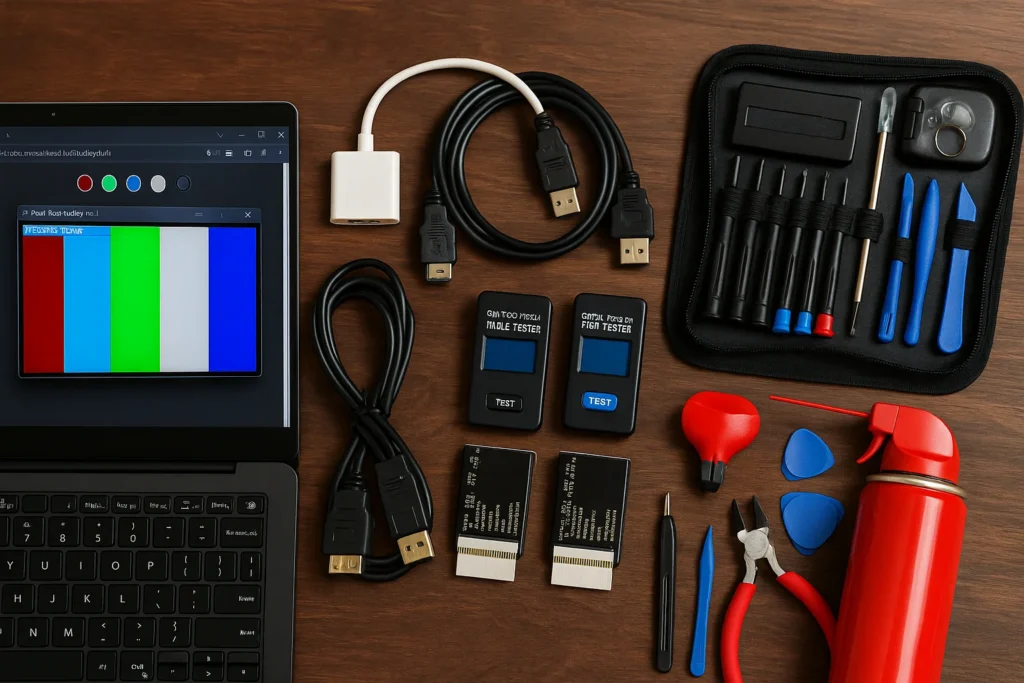
If your laptop screen shows vertical lines, determining whether the fault lies in the hardware or software often requires more than guesswork.
The right diagnostic tools and accessories can help you confirm if you’re dealing with a faulty display cable, damaged LCD panel, or GPU-related rendering problem.
Whether you’re a tech-savvy user or a laptop owner trying to avoid expensive repair bills, these tools can streamline your troubleshooting process and give you visual proof of where the problem lies.
1. Pixel Testing Software
Software tools like Dead Pixel Buddy and InjuredPixels can help identify issues such as dead pixels, screen artifacts, and inconsistent color banding.
These tools display solid backgrounds that reveal vertical colored lines, white spots, or stuck pixels that are not visible on regular content.
Pixel testers are especially useful when you’re unsure whether the problem is with the screen panel itself or a software issue like display corruption.
2. Display Cable Testers
A display cable tester allows you to check for continuity and voltage drops in internal connectors such as flex cables or LVDS/eDP ribbons.
When your laptop monitor shows vertical lines that flicker or shift while opening the lid, a damaged cable is often to blame.
Testing the cable before replacing the entire screen or motherboard can save time and cost—especially when the issue is related to signal interruption or loose pin connections.
2. USB-to-HDMI or VGA Adapters
To isolate a potential GPU or output signal issue, connecting your laptop to an external display via USB-to-HDMI or VGA adapters is essential.
If the external screen displays properly, the problem likely lies in the internal screen or ribbon cable. If the issue appears on both screens, you will likely have a GPU failure or rendering fault.
Adapters also allow you to test display behavior in mirrored and extended modes, offering better insight into graphics card output and port integrity.
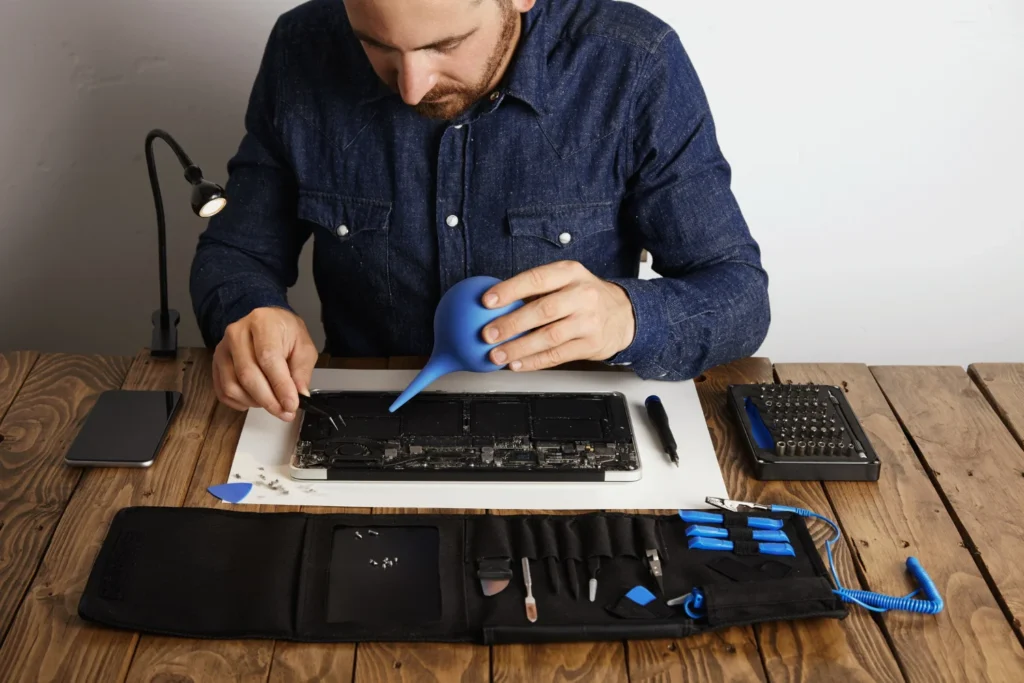
3. Compressed Air & Repair Tool Kits
Dust buildup near internal components—especially around connectors and vents—can cause overheating, leading to graphics rendering errors and screen glitches.
Compressed air to clear these areas, combined with a precision tool kit to open the chassis safely, allows for a safer and more thorough inspection of your flex cable, LCD socket, and cooling system.
These kits are especially useful when reseating cables, adjusting the screen hinge, or performing general hardware diagnostics.
Equipping yourself with these essential tools can help you control display issues without relying solely on guesswork. If your laptop screen has vertical lines, this toolkit will help you identify the cause with greater precision—often before any major damage occurs.
Final Thoughts
When your laptop screen shows vertical lines, it’s usually a sign that something needs attention—whether it’s a loose cable, a faulty driver, or a failing display panel.
The good news is that not every line means a major repair. Many issues can be fixed with simple checks like updating your display drivers, adjusting your resolution, or reseating the flex cable.
That said, if the lines appear during startup, in BIOS, or on an external monitor, the problem might be deeper—possibly with the GPU or screen itself.
In those cases, acting quickly can prevent further damage. And if DIY fixes don’t work, don’t hesitate to get help from a professional.
Most importantly, vertical or horizontal lines on your screen aren’t always permanent. With the right steps, many of these problems are fixable.
FAQs About Laptop screen shows vertical lines
How do you fix vertical lines on the laptop screen display?
Start by connecting your laptop to an external monitor. If the lines don’t appear externally, the issue is likely with your LCD panel or internal display cable.
You may have a faulty GPU or driver issue if they appear on both screens. Updating the display driver, adjusting the screen resolution, or reseating the flex cable are often effective first steps.
How do I get rid of vertical lines on my screen?
Begin with a simple reset, then test your System using built-in hardware diagnostics (e.g., HP’s F2 diagnostics or Dell SupportAssist).
Try updating your graphics driver, and if the problem persists, check for physical damage like screen pressure points, cable issues, or visible cracks on the panel. If nothing resolves it, the screen or GPU may need replacement.
Why is my LCD screen showing vertical lines?
Your LCD screen may show vertical lines due to hardware faults like a cracked panel, damaged flex cable, or loose internal connectors.
Sometimes, output signal disruption from a failing GPU or incorrect graphics rendering can create the same effect. Screen lines may also appear after system updates that affect display settings.
Could a loose or damaged ribbon cable be causing vertical lines?
Yes, this is a common cause. A damaged ribbon cable can interrupt the video signal from the motherboard to the screen, resulting in colored vertical lines, screen flickering, or parts of the display not rendering properly.
This is especially likely if lines change when moving the laptop lid or applying slight pressure.
Would updating my display driver likely fix the lines?
If the problem began after a Windows update or software installation, the issue may be related to a driver conflict.
Updating or reinstalling your display driver through Device Manager or the manufacturer’s website can fix screen artifacts caused by software-level glitches or compatibility problems.
Should I connect an external monitor to diagnose hardware problems?
Absolutely. Connecting to an external monitor helps isolate the problem. If the external display is clear and only your laptop screen shows lines, the issue is likely with your LCD panel or internal connections.
Your graphics card is likely the culprit if the external screen also shows vertical or horizontal lines.
Is resolution conflicts responsible for the lines I see?
Yes. An unsupported or incorrect screen resolution or refresh rate can cause display corruption, screen tearing, or vertical misalignment.
You can adjust these settings using your System’s display preferences. Switching to your screen’s native resolution often resolves such conflicts.
Also Read: