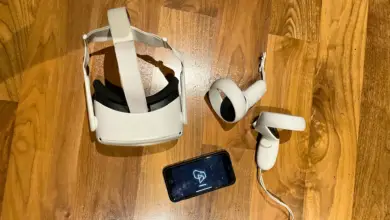
Pairing Meta Quest 3 controllers is an essential first step to enjoying immersive VR experiences. Whether you’re setting up your Quest 3 for the first time, replacing batteries, or troubleshooting connection issues, this comprehensive guide will help you quickly pair your Touch Plus controllers and get back to gaming.
If you’re wondering how to pair Meta Quest 3 controllers, you’re in the right place. Unlike previous models, the Meta Quest 3’s Touch Plus controllers come with advanced features like improved tracking, enhanced haptic feedback, and better battery efficiency. Ensuring they’re properly paired with your headset is essential to fully unlock these upgrades. This guide also applies to the newer Quest 3S controllers, as the pairing process is the same across both devices—making setup simple, fast, and reliable.
What You’ll Need to Pair Meta Quest 3 Controllers
Before starting the controller pairing process, make sure you have:
- Your Meta Quest 3 headset (powered on)
- Left and right Touch Plus controllers
- Fresh AA batteries installed in each controller
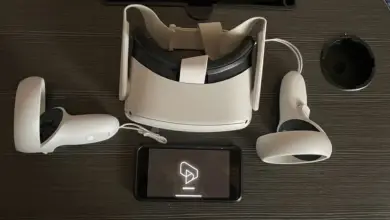
- Meta Quest mobile app installed on your smartphone
- A stable internet connection
How to Pair Meta Quest 3 Controllers: Step-by-Step Guide
Follow these simple steps to pair your Meta Quest 3 controllers with your headset:
1. Power On Your Quest 3 Headset
First, ensure your Quest 3 headset is powered on and ready. If you’re setting up for the first time, you’ll be prompted to pair your controllers during the initial setup process.
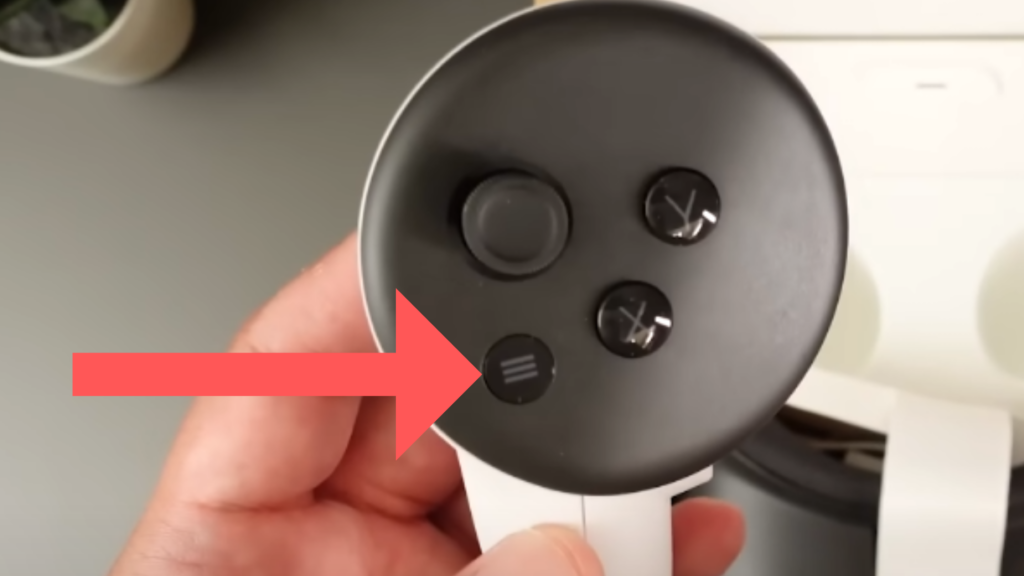
2. Activate the Left Controller
Press and hold the button with the three horizontal lines (Menu button) to power on the left controller.
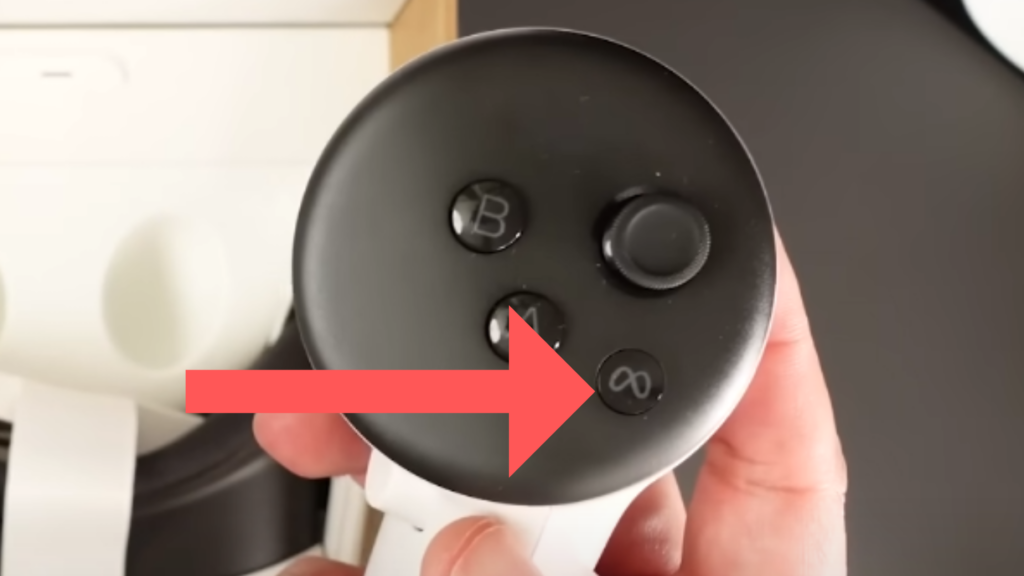
3. Activate the Right Controller
Press and hold the button with the Meta logo (Home button) to power on the right controller.
4. Verify Controller Activation
After approximately two seconds, an LED light will illuminate on each controller, indicating they’re powered on. The light may blink a few times during the initial activation.
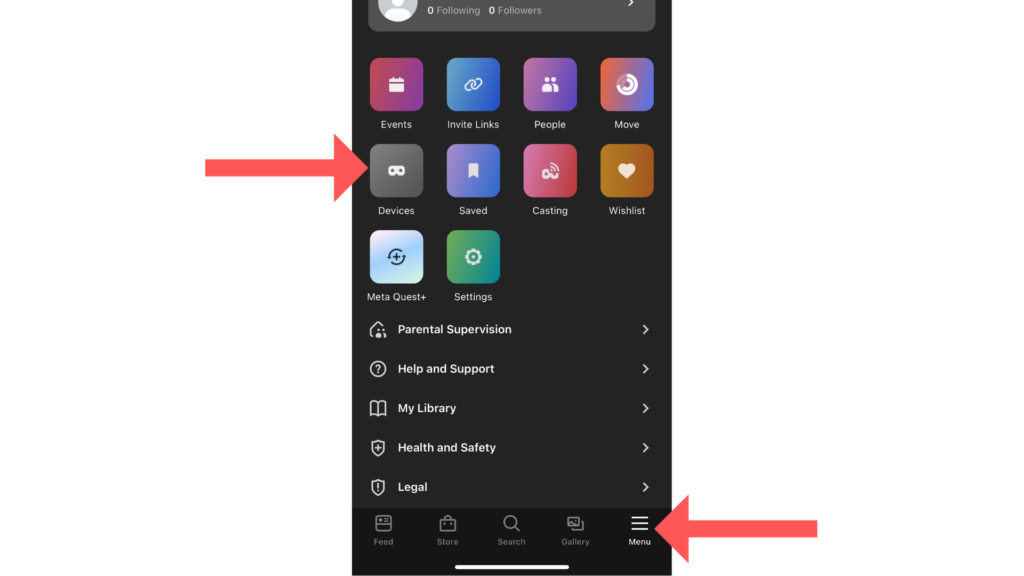
5. Use the Meta Quest Mobile App
Launch the Meta Quest app on your smartphone to complete the pairing process:
- Open the app and ensure you’re signed in
- Tap the Menu icon (three horizontal lines) in the bottom right
- Select “Devices” from the menu options
6. Select Your Headset
In the Devices section, locate and select your Quest 3 headset from the list of available devices.
7. Access Controller Settings
Once your headset is selected, tap “Controllers” and then choose either “Left” or “Right” depending on which controller you want to pair first.
8. Complete the Pairing Process
Follow the on-screen instructions in the app to finalize the pairing process. The controllers will flash a blue and white light when in pairing mode, and when successfully paired, the blue light will blink three times.
9. Verify Successful Pairing
Once paired, you should see your virtual hands appear in VR, mirroring your controller movements. If both controllers show up correctly in VR, the pairing was successful.
Understanding Controller LED Indicators
The LED lights on your Meta Quest 3 controllers communicate important status information:
- Solid white light: Controller is on and connected
- Blinking white light: Controller is searching for the headset
- Flashing blue and white: Controller is in pairing mode
- Three blue blinks: Pairing successful
- Orange light: Battery is low and needs replacement
- No light when button pressed: Battery is depleted or incorrectly installed
These LED patterns help diagnose connection issues and battery status at a glance.
Pairing After Battery Replacement
When you replace batteries in your Meta Quest 3 controllers, they typically maintain their pairing with the headset. However, if a controller doesn’t reconnect automatically after a battery change, follow these steps:
- Make sure the battery is correctly installed with proper polarity (+/-)
- Press and hold the Menu button (left controller) or Home button (right controller) for 2-3 seconds
- Wait for the controller LED to light up, indicating it’s powered on
- The controller should automatically reconnect to your headset
If automatic reconnection fails, you may need to manually re-pair the controller using the Meta Quest app as described in the steps above.
Advanced Troubleshooting for Pairing Issues
If you’re experiencing difficulties pairing your Meta Quest 3 controllers, try these advanced troubleshooting steps:
Controller Not Detected by Headset
- Check Battery Installation: Ensure batteries are fresh and correctly installed. Low battery power is a common cause of pairing issues.
- Reset the Controller: For persistently unresponsive controllers, perform a controller reset:
- For the right controller: Hold the A button and tap the Home button 5 times
- For the left controller: Hold the X button and tap the Menu button 5 times
- The LED will blink orange, indicating the controller has been reset
- Adjust Proximity: Move the controllers closer to the headset during the pairing process. Try keeping them within 1 meter (3 feet) of the headset.
- Restart Your Headset: Sometimes a full headset restart can resolve connection issues:
- Press and hold the power button for 10 seconds
- Select “Restart” from the power menu
- Wait for the headset to fully reboot before attempting to pair again
Inconsistent Tracking or Drifting
- Check Environmental Conditions: Ensure you’re in a well-lit room without direct sunlight, which can interfere with controller tracking.
- Clean Tracking Cameras: Gently wipe the headset’s external cameras with a microfiber cloth to remove any smudges or dust.
- Update Firmware: Make sure your Quest 3 is running the latest firmware:
- In the headset, go to Settings > System > Software Update
- Install any available updates and restart your headset
Persistent Connection Issues
If controllers continue to have pairing problems:
- Factory Reset Controllers: For persistent issues, you can factory reset a controller:
- Remove the battery
- Hold the trigger, grip button, and Menu/Home button simultaneously
- While holding these buttons, reinsert the battery
- Continue holding the buttons for 15 seconds
- Release when the LED blinks in a pattern
- Check for Interference: Bluetooth signals can be disrupted by other devices. Try pairing in a different location away from wireless routers, microwave ovens, or other Bluetooth devices.
- Contact Meta Support: If all else fails, reach out to Meta’s official support for further assistance.
Conclusion
Pairing Meta Quest 3 controllers is a straightforward process that takes just a few minutes. By following the steps outlined in this guide, you can quickly connect your controllers and get started with your VR experience. If you encounter any issues during the pairing process, the troubleshooting tips provided should help resolve most common problems.
Remember that properly paired controllers are essential for the full meta Quest 3 experience, providing precise tracking and immersive haptic feedback. Regular maintenance, including timely battery replacement and firmware updates, will ensure your controllers continue to perform optimally.
Frequently Asked Questions
Do Quest 3 controllers automatically reconnect after being turned off?
Yes, after initial pairing, Meta Quest 3 controllers will automatically reconnect to the headset when powered on, as long as they’re within range and have sufficient battery power.
How long do batteries last in Meta Quest 3 controllers?
With regular use, the AA batteries in Quest 3 controllers typically last 2-3 months. Battery life varies based on usage frequency, haptic feedback intensity, and battery quality. Using rechargeable batteries is an economical and environmentally friendly option.
Can I use my Quest 3 controllers with Quest 2 or other headsets?
No, Meta Quest 3 controllers are specifically designed for the Quest 3 and Quest 3S headsets and are not backward compatible with Quest 2 or other previous models.
Why does my controller vibrate differently after pairing?
After pairing, your controllers may undergo a brief calibration process that could cause slight variations in vibration intensity. If vibrations remain weak, check battery levels as low power can reduce haptic feedback strength.
How do I know when controller batteries need replacement?
When controller batteries are low, you’ll see an orange LED light when powering them on, and you may receive a low battery notification in your headset. Additionally, haptic feedback may become weaker, and tracking might become less reliable.
Can I use the Meta Quest 3 without controllers?
Yes, the Quest 3 supports hand tracking for navigation and some apps, allowing controller-free operation. However, controllers provide more precise input and are required for most games and applications.
What should I do after I pair Meta Quest 3 controllers?
Once you’ve figured out how to pair Meta Quest 3 controllers, there’s a lot more you can do to level up your VR experience. Start by optimizing your Quest 3’s battery life to enjoy longer play sessions without interruption. For social fun, learn how to cast your Quest 3 to a TV and share the action with friends. Curious about immersive content? Explore how to watch 3D movies on your headset for a true cinema-like experience. And if you notice your controllers blinking unexpectedly, understanding those light signals will help you troubleshoot quickly. Pairing is just step one—your VR journey has only begun!