


For those of you who are Disney Plus subscribers and curious about how to capture screenshots while enjoying your favorite content, you’re in the right place.
In this comprehensive guide, we will dive into the different ways to capture screenshots on various devices, delve into Disney Plus’s screenshot policy, and provide solutions for common issues you may face. However, please remember to use this information responsibly and in compliance with Disney Plus’s terms of service and copyright regulations.
How to Take Screenshots on Disney Plus
Overcoming Screenshot Barriers: Disabling Hardware Acceleration
Taking screenshots from Disney Plus can be quite challenging due to the streaming service’s content protection mechanism.
However, this can often be resolved by disabling Hardware Acceleration in your browser settings. Here’s how to do that:
- Go into your browser settings and locate the advanced settings page. For Google Chrome users, this can be found by clicking the Google Chrome menu (the three dots on the top right corner) >in Settings > System.
- Find and disable the feature called Hardware Acceleration.
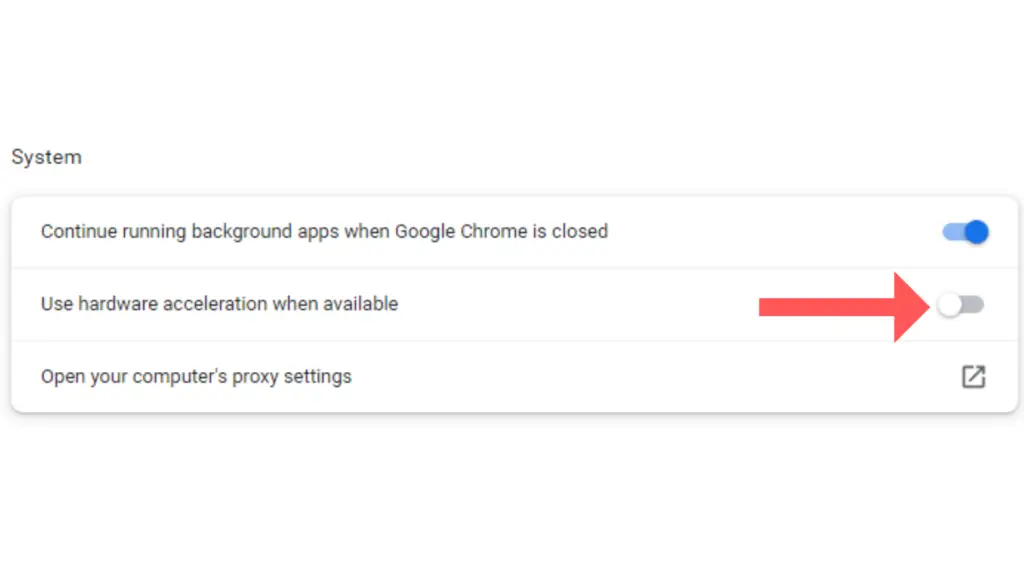
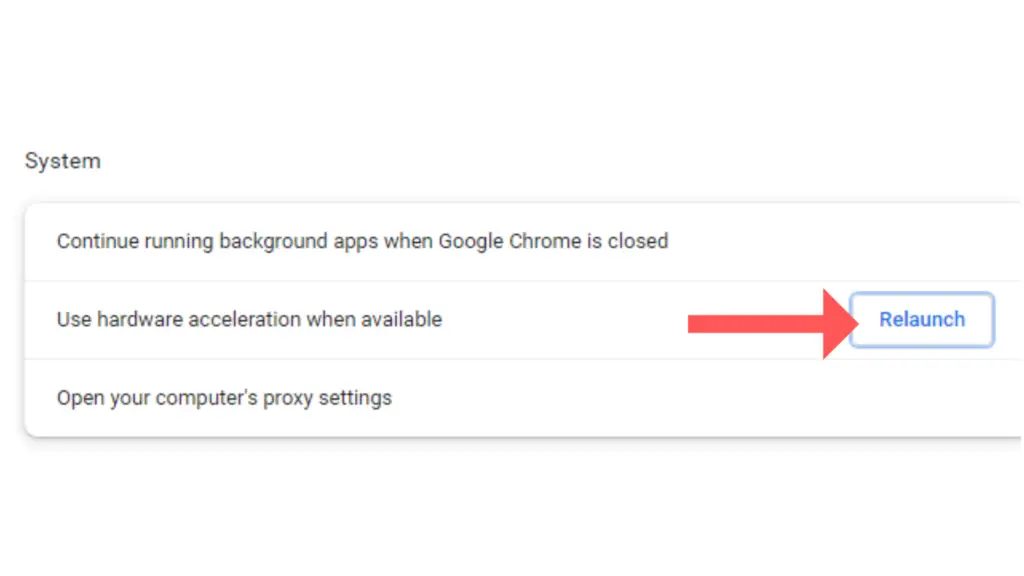
- Make sure you relaunch the browser before proceeding.
Once you’ve disabled Hardware Acceleration, you can proceed with the following steps depending on your device.
For Windows Users:
Windows-based PC users can utilize several methods:
- Snipping Tool: This handy tool comes preinstalled on all Windows Vista, 7, 8, and 10 versions. To use it, launch the Snipping Tool, select the type of snip you need, and then designate the portion of your screen to be captured.
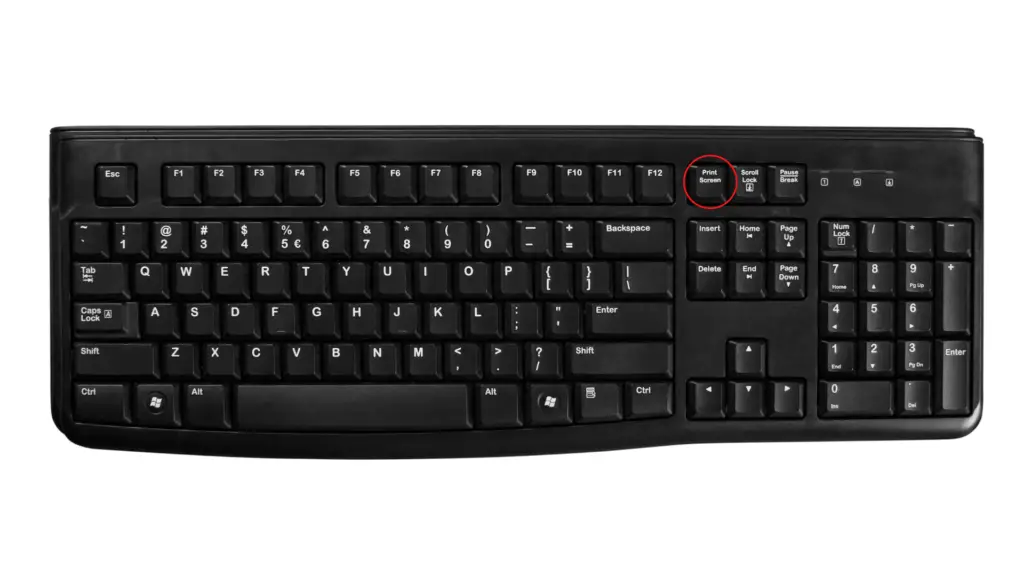
- Print Screen (PrtScn) Button: This key is standard on most PC keyboards. Hitting it will snap a picture of your entire screen and transfer it to your clipboard, ready to be pasted into an application like Paint or Word. To capture only the currently active window, press Alt + PrtScn.
For MacOS Users:
For MacOS users, the process varies slightly:
- Command + Shift + 3: Using this keyboard shortcut will capture a full screenshot and instantly save it as a file on your desktop.
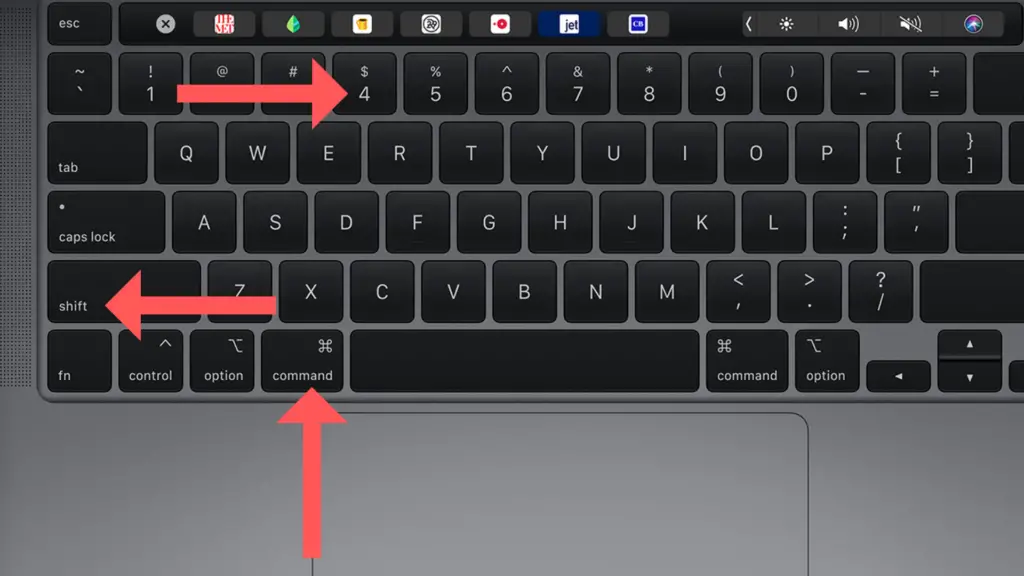
- Command + Shift + 4: This command allows you to define the area of your screen you’d like to capture. After triggering the shortcut, drag the cursor to select the desired capture area.
Screenshotting on Android Devices
On most Android devices, screenshots can be taken by pressing and holding the Power button along with the Volume Down button at the same time. Hold these two buttons for a couple of seconds, and your device will capture the current screen. Note that the exact procedure can differ based on your device’s manufacturer and the version of Android you’re using.
Screenshotting on iOS Devices
The process of capturing screenshots for iPhone users varies based on the iPhone model:
- iPhone X and newer models (without a Home button): Press and hold the Side button located on the right of your device, then promptly click the Volume Up button. Release both buttons afterward.
- iPhone 8 and older models (with a Home button): Press and hold the Top or Side button, then immediately click the Home button. Again, release both buttons simultaneously.
Bear in mind that your ability to capture a screenshot on Disney Plus can be influenced by both the specific content and the platform’s inherent restrictions. If you encounter any issues, refer to our section on troubleshooting common screenshot problems for further guidance.
For those of you who are Disney Plus subscribers and curious about how to capture screenshots while enjoying your favorite content, you’re in the right place.
In this comprehensive guide, we will dive into the different ways to capture screenshots on various devices, delve into Disney Plus’s screenshot policy, and provide solutions for common issues you may face. However, please remember to use this information responsibly and in compliance with Disney Plus’s terms of service and copyright regulations.
How to Take Screenshots on Disney Plus
Overcoming Screenshot Barriers: Disabling Hardware Acceleration
Taking screenshots from Disney Plus can be quite challenging due to the streaming service’s content protection mechanism.
However, this can often be resolved by disabling Hardware Acceleration in your browser settings. Here’s how to do that:
- Go into your browser settings and locate the advanced settings page. For Google Chrome users, this can be found by clicking the Google Chrome menu (the three dots on the top right corner) >in Settings > System.
- Find and disable the feature called Hardware Acceleration.
- Make sure you relaunch the browser before proceeding.
Once you’ve disabled Hardware Acceleration, you can proceed with the following steps depending on your device.
For Windows Users:
Windows-based PC users can utilize several methods:
- Snipping Tool: This handy tool comes preinstalled on all Windows Vista, 7, 8, and 10 versions. To use it, launch the Snipping Tool, select the type of snip you need, and then designate the portion of your screen to be captured.
- Print Screen (PrtScn) Button: This key is standard on most PC keyboards. Hitting it will snap a picture of your entire screen and transfer it to your clipboard, ready to be pasted into an application like Paint or Word. To capture only the currently active window, press Alt + PrtScn.
For MacOS Users:
For MacOS users, the process varies slightly:
- Command + Shift + 3: Using this keyboard shortcut will capture a full screenshot and instantly save it as a file on your desktop.
- Command + Shift + 4: This command allows you to define the area of your screen you’d like to capture. After triggering the shortcut, drag the cursor to select the desired capture area.
Screenshotting on Android Devices
On most Android devices, screenshots can be taken by pressing and holding the Power button along with the Volume Down button at the same time. Hold these two buttons for a couple of seconds, and your device will capture the current screen. Note that the exact procedure can differ based on your device’s manufacturer and the version of Android you’re using.
Screenshotting on iOS Devices
The process of capturing screenshots for iPhone users varies based on the iPhone model:
- iPhone X and newer models (without a Home button): Press and hold the Side button located on the right of your device, then promptly click the Volume Up button. Release both buttons afterward.
- iPhone 8 and older models (with a Home button): Press and hold the Top or Side button, then immediately click the Home button. Again, release both buttons simultaneously.
Bear in mind that your ability to capture a screenshot on Disney Plus can be influenced by both the specific content and the platform’s inherent restrictions. If you encounter any issues, refer to our section on troubleshooting common screenshot problems for further guidance.
Understanding the Restrictions on Screenshots
Screenshots might seem like a simple and harmless action, but they’re not always welcomed or even allowed by all platforms. Particularly, streaming services like Disney Plus have put measures in place to restrict screenshots.
Disney Plus Content Protection Mechanism
The reason you may struggle to take screenshots on Disney Plus is their use of a content protection mechanism. This is a technical process put in place to avoid copyright infringement and piracy. When you try to capture the screen while streaming content, the application or service detects this and blocks the capture, usually resulting in a black, blank image. This is a common measure across most paid streaming platforms to safeguard copyrighted material from being distributed without permission.
Legal Implications of Screenshots
Although it may seem inconvenient, these restrictions are not just for the sake of the streaming services. They also exist to protect you, the user, from inadvertently violating copyright laws. When you sign up for a service like Disney Plus, you agree to a Terms of Service which typically prohibits actions like distributing content without express permission.
Screenshots, while seemingly harmless, can be seen as a form of distribution, especially if they are shared publicly. It’s important to note that using a workaround to take a screenshot does not exempt you from these laws and you could be held liable if you infringe upon the copyright of the material.
Therefore, it’s essential to understand that these restrictions are in place not just to protect Disney Plus and its content creators, but also to protect viewers from legal implications. Always use caution when considering screenshotting or sharing content from these platforms.