Getting started with your Meta Quest 3? One of the very first—and most important—steps is learning how to pair Meta Quest 3 to your phone using the Meta Quest mobile app. This connection isn’t just required for setup—it unlocks key features like remote app installs, casting, and seamless access to your VR library.
Whether you’re setting up a new device or reconnecting after a factory reset, this guide covers everything from entering the Meta Quest 3 pairing code to fixing pairing issues that might pop up. We’ll help you troubleshoot common problems, explore Meta Quest 3 mobile app features, and ensure you enjoy a smooth, hassle-free setup on both iPhone and Android.
What is the Meta Quest Mobile App?
The Meta Quest mobile app (recently renamed to Meta Horizon) serves as a companion to your Meta Quest 3 headset, vastly expanding its functionality and convenience. This app is essential not just for initial setup but offers numerous features that enhance your VR experience:
- Store Access and Management: Browse, buy, and download VR applications and games directly from your phone, then install them remotely to your headset
- Device Control Center: Adjust headset settings, check battery status, and manage storage without putting on your headset
- Content Sharing: Cast your VR experience to your phone or compatible smart TVs, making it easy to share with friends and family
- Social Hub: Connect with friends, see their activity, and coordinate multiplayer sessions
The app transforms your phone into a control center for your VR experience, making it easier to manage your headset without constantly putting it on and taking it off. Available for both iOS and Android devices, it creates a seamless bridge between your everyday smartphone use and your immersive VR adventures.
Requirements Before Pairing
Before attempting to pair your Meta Quest 3 with your phone, make sure you have the following:
- A fully charged Meta Quest 3 headset: Ensure your headset has sufficient battery (at least 50% recommended) to prevent interruptions during setup and handle any necessary updates.
- A compatible smartphone:
- iOS: iPhone 6S or later running iOS 13.0+
- Android: Running Android 8.0 (Oreo) or higher
- Stable connections: Both devices must be connected to the same Wi-Fi network, and your phone’s Bluetooth must be turned on for discovery.
- Meta Quest mobile app installed: Download the latest version from your device’s app store:

- Meta account: You’ll need a Meta account (you can create one during the setup process if needed).
Pro Tip: Before beginning the pairing process, restart both your phone and headset to ensure a clean connection attempt and prevent potential software conflicts.
How to Pair Meta Quest 3 to Your Phone
Follow these steps to pair your Meta Quest 3 headset with your smartphone:
Step 1: Prepare Your Devices
Power on your Meta Quest 3 by pressing and holding the power button on the right side of the headset for 2-3 seconds until you hear a startup chime. Make sure your headset is connected to Wi-Fi (you’ll need to complete this basic setup step in the headset). Ensure your smartphone has Bluetooth turned on and is connected to the same Wi-Fi network.
Step 2: Install and Set Up the Meta Quest App
Download and install the Meta Quest mobile app from your device’s app store if you haven’t already. Launch the app on your smartphone and log in with your Meta account or create a new one by following the on-screen prompts.
Step 3: Initiate the Pairing Process
Within the Meta Quest app, tap the Menu icon (three horizontal lines) in the top corner. Select Devices from the menu options.
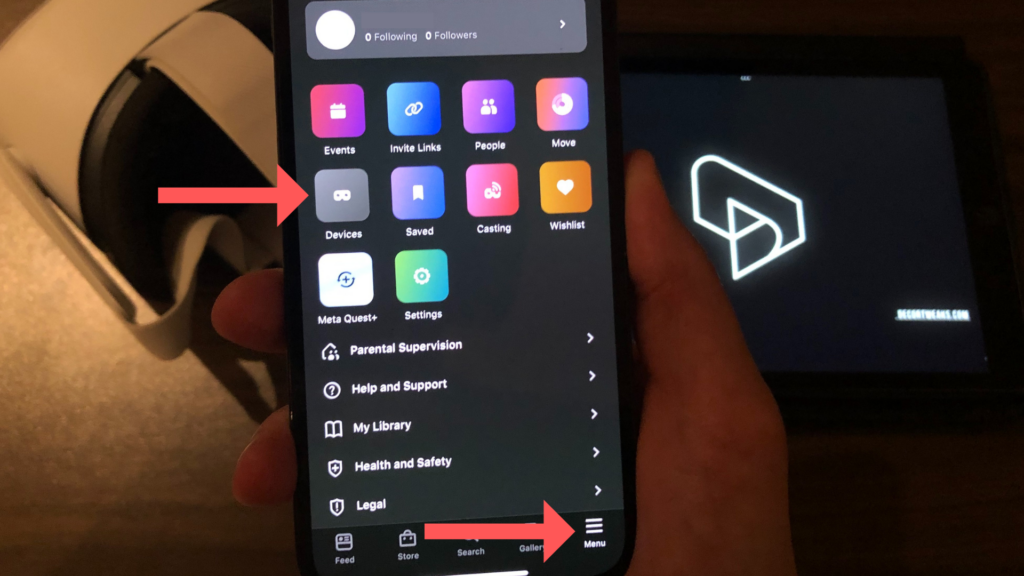
Tap Connect new device, then select Meta Quest 3 from the options. Follow the on-screen instructions in the app to begin the pairing process.
Step 4: Complete the Pairing
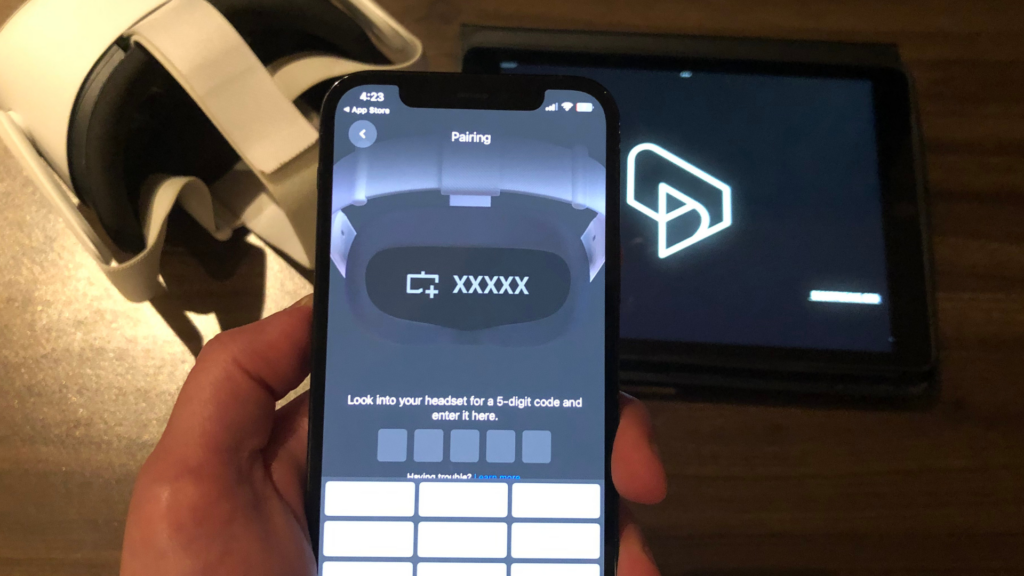
The app will attempt to automatically detect and pair with your Meta Quest 3. If successful, you’ll see a confirmation message on both your phone and inside the headset.
If automatic pairing doesn’t work:
- Put on your Meta Quest 3 headset
- Look for a 5-digit pairing code displayed in the headset
- Enter this code in the Meta Quest app when prompted
Important: Don’t close the Meta Quest app or switch to another app during the pairing process, as this can interrupt the connection and force you to start over.
iOS and Android Pairing Differences
While the general pairing process is similar across devices, there are some platform-specific considerations when connecting your Meta Quest 3 to different phones.
For iPhone Users:
Apple’s strict privacy policies create some unique steps for iOS devices. When prompted, always allow Bluetooth permissions for full functionality. For optimal performance:
- Enable Background App Refresh for the Meta Quest app (Settings > General > Background App Refresh)
- Enable Location Services (Settings > Privacy > Location Services > Meta Quest app > “While Using the App”)
- If pairing fails, force close the app, toggle Airplane mode on/off, and try again
For Android Users:
Android’s open nature means there are different considerations:
- Allow location permissions when prompted (required for Bluetooth scanning)
- Disable battery optimization for the Meta Quest app (Settings > Apps > Meta Quest > Battery > “Don’t optimize”)
- For persistent issues, try clearing the app cache (Settings > Apps > Meta Quest > Storage > Clear Cache)
Manufacturer-specific settings on Android phones may also affect pairing. Samsung, Xiaomi, and other brands often have additional battery-saving features that can restrict Bluetooth connections—check your phone’s settings to ensure the Meta Quest app isn’t being limited.
What to Do After Successful Pairing
Once you’ve successfully paired your Meta Quest 3 with your smartphone, here are some important steps and features to explore:
Update Your Headset
The Meta Quest app will automatically check for firmware updates for your headset. Always keep your headset updated for the best performance and features. Navigate to Settings > Device in the app to check for and install any available updates.
Explore the Store
One of the greatest conveniences of the mobile app is browsing the Quest Store directly from your phone. You can discover new games and applications, read reviews, watch trailers, and purchase content that will automatically download to your headset when it’s connected to Wi-Fi.
Customize Your Experience
The app allows you to adjust numerous settings without putting on the headset:
- Change Wi-Fi networks
- Manage storage space
- Update payment information
- Adjust guardian boundaries
Set Up Casting
Share your VR experience with friends by setting up casting through the app. Simply tap the casting icon, select your headset, and choose where to cast—either to your phone or a compatible TV. This feature transforms VR from a solitary experience into a social one.
Connect with Friends
The social features within the app connect you to the broader Meta Quest community. Add friends to your network, see who’s online and what they’re playing, and join friends in multiplayer games with just a few taps.
The Meta Quest mobile app continues to evolve with regular updates adding new features and improvements. Check for app updates regularly to ensure you’re getting the most out of the phone-headset connection.
Finding Your Meta Quest 3 Pairing Code
If automatic pairing doesn’t work, you’ll need to find your Meta Quest 3 pairing code. Here’s how to locate it:
During Initial Setup
When you first set up your headset and reach the pairing step, the 5-digit code will appear automatically on your headset’s display after you’ve completed basic configuration like language selection and Wi-Fi connection.
From the Settings Menu
If you need to find the code after initial setup:
- Put on your Meta Quest 3 headset
- Open the Quick Settings by pressing the Oculus button on your right controller
- Select Settings (gear icon)
- Navigate to System > About
- Look for Pairing Code in the information list
After Factory Reset
If you’ve performed a factory reset and need to pair again, complete the initial setup process in the headset, and the pairing code will appear during the setup when you reach the pairing step.
Important: The pairing code is temporary and will change each time you initiate the pairing process. Make sure to enter it promptly when it appears.
Troubleshooting Pairing Issues
Despite the streamlined design of the Meta Quest 3, pairing issues can sometimes occur. Here’s how to resolve common problems:
App Doesn’t Detect the Headset
If your app fails to find your headset, try these solutions:
- Ensure Bluetooth is enabled on your phone and not in Airplane mode
- Verify both devices are connected to the same Wi-Fi network
- Keep your phone and headset within 10 feet of each other
- Check that the Meta Quest app has all required permissions
- Restart both your phone and Meta Quest 3
- Try pairing in a different location away from other Bluetooth devices
Pairing Code Not Appearing
When the 5-digit code doesn’t show up:
- Make sure you’ve completed the initial Wi-Fi setup on the headset
- Check that your headset has sufficient battery power
- Restart your Meta Quest 3 by holding the power button for 10 seconds
- Navigate to Settings > About to manually find the pairing code
- If no code appears anywhere, try a soft reset by holding the power and volume down buttons for 10 seconds
Connection Unstable or Disconnects Frequently
For persistent connection issues:
- Move away from other electronic devices that might cause interference
- Ensure both devices have the latest software updates
- Disable power saving modes during the pairing process
- Check that your Wi-Fi router isn’t restricting connections between devices
“Device Not Supported” Message
If you receive compatibility errors:
- Verify your phone meets the minimum requirements
- Update your phone’s operating system
- Download the latest version of the Meta Quest app
- Check Meta’s official list of supported devices
Last Resort: Factory Reset
If all else fails, a factory reset might be necessary. Be aware this will erase all data on your headset, though your purchases remain tied to your account. To perform a reset:
- Power off your Meta Quest 3
- Hold the power and volume down buttons simultaneously until the boot screen appears
- Use the volume buttons to navigate to “Factory Reset” and the power button to select
- After reset, begin the pairing process again from scratch
Conclusion
Pairing your Meta Quest 3 to your phone isn’t just a setup step—it’s the gateway to unlocking its full potential. From accessing the Meta Quest 3 mobile app features to browsing content and customizing settings, your smartphone becomes an essential part of the VR experience.
If you ran into any Meta Quest 3 pairing issues along the way, we hope this guide helped clear them up. Following these steps on how to pair Meta Quest 3 to phone should make the process smooth, whether you’re using an iPhone or Android.
As Meta continues to roll out updates, new tools and improvements will enhance how your headset and phone work together. So stay updated, stay connected, and keep exploring your virtual world with ease.
Frequently Asked Questions
Do I need to pair my Meta Quest 3 to my phone every time I use it?
No, you only need to pair your Meta Quest 3 with your phone during the initial setup or after performing a factory reset. After successful pairing, your devices will remember each other.
Can I pair my Meta Quest 3 with multiple phones?
Your Meta Quest 3 can only be paired with one phone at a time. If you want to pair it with a different phone, you’ll need to complete the pairing process with the new device, which will replace the previous connection.
What happens if I uninstall the Meta Quest app?
Uninstalling the app doesn’t affect your headset’s functionality, but you’ll lose access to mobile features like remote app installation and casting. If you reinstall the app, you may need to log in again, but you typically won’t need to repeat the full pairing process.
I’ve paired successfully but can’t cast to my phone. What’s wrong?
Casting requires both devices to be on the same Wi-Fi network. Also, make sure your Wi-Fi network allows device-to-device communication and that you’ve granted the necessary permissions for the Meta Quest app. Try toggling Wi-Fi off and on on both devices if problems persist.
Do I need a Facebook account to pair my Meta Quest 3?
As of 2025, you no longer need a Facebook account to use Meta Quest 3. You can create a Meta account separately, though you have the option to link it to Facebook if desired.
Can I pair my Meta Quest 3 controllers without pairing the headset?
The controllers pair directly with the headset, not with your phone. You must pair the headset first, and then the controllers will be recognized through that connection.