The Oculus series, specifically the Oculus Quest 2, is designed to be the ultimate in immersive, virtual reality gaming. Resolution-wise, it’s a drastic improvement on nearly every level over the original Oculus Quest.
However, like most gadgets out there, sometimes you will need to do a bit of tweaking to boost the graphics quality and avoid unwanted blurry visuals.
In most cases, your Oculus Quest 2 may be blurry due to its current performance settings; these include Resolution, refresh rate, Distortion Curvature, Encode Resolution, Encode Bitrate, or your Texture size. Adjusting these settings can make a major improvement in your device’s visuals. Alternatively, it can be caused by inaccurately positioned IPD settings or headset straps that are adjusted incorrectly.
Here are the most common solutions to this issue:
- Adjust Headset & Straps
- Adjust IPD Settings
- Adjust PC’s power management settings (If using Oculus Link)
- Adjust Performace Settings (Resolution, Refresh Rate)
- Utilize Oculus Debug Tool to Adjust Distortion Curvature, Encode Resolution Width, or Encode Bitrate
- Adjust Texture Sizes (Through SideQuest)
- Adjust the device to fit your Glasses
- Check for Dirty or Defective lenses
Now let’s take a look at each step in detail. Let’s dive in!
How to Fix A Blurry Oculus Quest 2 Headset:
1. Adjusting the Headset and Straps
The Oculus Quest 2 is designed with Fresnel lenses that feature a series of concentric rings; this leaves a very small room that offers the best optics. To achieve the best optics,, your pupils need to be perfectly aligned with your headset. The headset will need to be adjusted to perfectly align your pupils to the lense, as well as offer stability in that position.
If this is your first time, don’t feel too bad. Everybody has trouble finding the perfect fit and will only reach that comfort zone through consistent usage and as you become more and more comfortable with the device.
The first thing you need to do is place the headset on without the straps. The reason for doing this is so that you can move the headset around as much as possible until you can kind of get a feel for exactly how you want them when you put the straps on.
When you place the straps back on the device, you can adjust from the up and down, along with the left and right, until you get it exactly the way you were the most comfortable when you tried it on without the head straps.
If you feel like you just can’t get a comfortable fit with the default Oculus head straps, a great alternative is the Oculus Quest 2 Elite Strap; the Elite straps are quite pricey; however,, they do a better job at offering greater support. It’s designed with a plastic material that is more ergonomic than the cloth straps that come shipped with the Oculus Quest 2; The Elite strap is also designed to cradle the back of your head in order to offer greater weight distribution of the headset. Additionally, it features a dial in the back, allowing you to achieve a more precise fit.
2. Adjust the IPD Settings
IPD stands for your Inter-Pupillary distance, referring to the distance between your pupils. Since the oculus quest uses Fresnel lenses, it’s very important that you measure your IPD correctly.
You’re able to find out your IPD at home by using an IPD checker app. Alternatively, you can measure your IPD by using a millimeter ruler. As shown below.
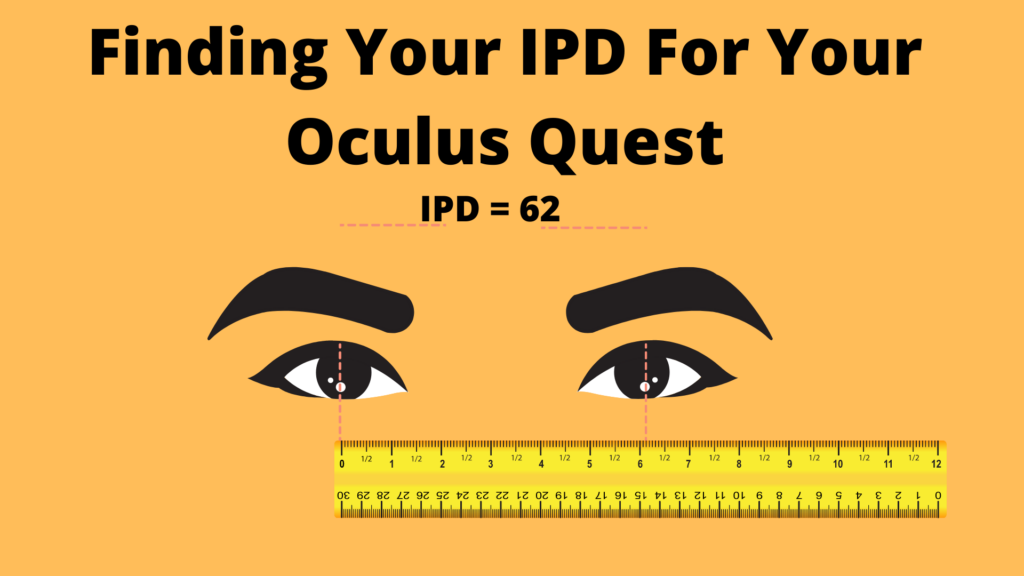
The Oculus 2 comes with three IPD settings; these are 58,63, & 68. Now you may be wondering what if my IPD are different from the ones provided. Oculus recommends picking the IPD closest to yours. Many users have found that it is possible to center the Oculus IPD between each setting, for example, 1.5,2.5. While some users claim this method improved their image quality, others found issues with this method since it might not match your Oculus settings.
3. Adjust Power Management Settings (If Using Oculus Link)
If your Oculus Quest tends to be blurry when using the oculus link, the issue may be that your PC is limiting the power granted to your Oculus & link cable, thus offering mediocre performance.
You can change this by going to your PC -> Press the Windows Key -> type in Power -> Additional Power Settings -> Change power settings ->Change Advanced power settings -> USB settings -> Disable USB selective suspend setting.
4. Adjust Performance Settings (Resolution, Refresh Rate)
Next, you may need to adjust your performance settings in order to potentially improve the blurriness of your Oculus Quest 2 headset.
An important thing to note here is that increasing the refresh rate will mean you will also need to increase your render resolution; increasing your refresh rate without increasing your render resolution is what leads to blurry visuals.
If your PC can’t handle the higher render resolution, then it’s best to play with a lower refresh rate in order to experience crisp & clear resolution.
- Open the app on your computer
- Select Devices on the left side of the screen
- Select Quest and Touch
- Select Graphics Preferences
You’re going to focus on Refresh Rate and Render Resolution. The refresh rate is the number of times your screen refreshes every second (updates). There are four different refresh rates available for you to select, which are 72Hz, 80Hz, 90Hz, & 120 Hz.
The highest resolution that your device can be set to is 5408 x 2736. You can lower this resolution if you want or raise it up, depending on what your hardware can handle.
(Skip to 5:53 for video demonstration)
Additionally, if you’re going to be playing SteamVR, you would want to change the resolution in the theSteamVR app to match your chosen resolution on your Oculus App.
There’s a fine line that you have to play with here since raising the refresh rate, and the resolution will affect the performance of your games, especially if you have a slower internet connection to work with.
5. Oculus Debug Tool (Adjust Distortion Curvature, Encode Resolution Width, Encode Bitrate)
Adjusting the distortion curvature, encode resolution width, & Encode Bitrate can offer major improvements to your Oculus’s visual quality.
To find your Oculus Debug Tool:
- On your PC go to Program Files -> Oculus -> Support -> Oculus Diagnostics ->Oculus Debug Tool
Distortion curvature
While there is no official description given for this feature, it likely sets the curve at which the resolution is reduced on your peripheral vision.
When adjusting this feature, it’s important to note that The ‘Low’ settings offer greater quality than ‘High’.
How much you would need to adjust depends on your PC and its capabilities.
Encode Resolution Width
Your cable sends a compressed video stream to your device when using your Oculus Quest with Oculus link. The encode resolution width determines the resolution of the video stream.
How much you would need to adjust depends on your PC and its capabilities.
Encode Bitrate
Another feature that affects the visual quality of your device when using Oculus Link is the Encode Bitrate. Since the Oculus link compresses the image in order to stream it to your device, the bitrate will have an impact on the visual quality.
A quick note: if you’re using the Virtual desktop streamer app, you will need to disable the settings that automatically adjust your device’s bitrate. Otherwise, your changes will not be executed.
6. Adjust the Texture Sizes
In order to do this, you will have to connect the Oculus Quest 2 to your PC. Once you do that, you can make changes to the texture sizes, which is a surprisingly helpful tool for reducing blurriness. Currently, the easiest way to do this is through SideQuest.
How to setup SideQuest on your PC & Adjust Texture Sizes:
- Register your Oculus Account as a Developer
- Download & Install ADB Drivers ( Only If you’re using a Windows PC)
- Once the driver is installed, you will need to restart your PC
- Enable Developer Mode by going to your Oculus app on your phone and tap on the menu tab located on the bottom right corner. Then select Devices -> Developer Mode -> Enable (Ensure your Oculus Quest is turned on & your mobile device’s Bluetooth connection is turned on & connected to the same Wifi network as your mobile device)
- Install Sidequest on your PC
- Open SideQuest on your PC
- Connect your Oculus Headset to your PC via cable or
- On the Oculus headset, allow USB debugging.
- Now you’ll notice a green circle will appear on the upper right corner near the sidequest logo, indicating you are now connected to SideQuest.
- Next, select Device settings & tools (Wrench icon)
- Scroll down to Default Texture Size
- Many users found a great texture size to be 2048. However, it also does depend on your hardware. Feel free to experiment on different texture sizes to find the ideal one that reduces your device’s Blurriness
How to setup SideQuest on your Android Phone:
Sidequest is also now available for mobile devices, and you will also be able to adjust some of your graphics settings through the mobile app. (Note: not all graphics settings options are available in the Sidequest mobile app as of writing the Default Texture Size” is not currently adjustable on the mobile app. However, there are several other performance settings you’re able to control)
requirements to use SideQuest on your phone:
- You will need an Android Phone (IOS device’s arent compatible, unfortunately)
- A cable to connect your Quest to your Phone
How to setup SideQuest on your mobile Phone:
- Register your Oculus Account as a Developer
- Once you’ve registered your Oculus account as a developer, you will be able to view your Organization name on the dropdown menu.
- Open the Oculus Quest App
- Select the Settings tab located on the bottom right corner
- Select the drop-down arrow for your Quest headset
- Select More Settings
- Select Developer Mode & Enable Developer Mode
- Install the SideQuest App on your Mobile device & login/signup
- Connect your USB to USB-c cable from your Oculus Quest to your Phone
- Allow SideQuest to access your Oculus Quest.
- You will Recieve a pop up “Choose an App for the USB device) Select Sidequest installer
- Now within your Oculus Headset, you will need to allow USB debugging by selecting Allow.
- Your sidequest app logo will now display a green circle indicating it is now connected & ready to be used.
- Now to adjust your Texture sizes within the App Select, the … Tab Located on the bottom right corner of the sidequest app.
- Now select Tools
- Now you’ll be able to adjust your device’s performance settings.
7. Do You Normally Wear Glasses?
While you can wear glasses underneath just about any VR headset, they are all going to be incredibly uncomfortable over time, no matter how well it fits at first. That’s because the rim of the glasses will be pushed into the bridge of your nose and likewise with the frames.
There are three options for those who wear glasses to try out with the Oculus Quest 2. The first thing that you want to try is to adjust the visual settings, primarily the IPD, to see if you can get anything out of it while wearing glasses.
The second thing that you can try is fitting glasses spacers inside the Oculus Quest 2. This will push the device farther away from your head, giving your glasses more room accommodating that fit without smashing them into your face.
The last is, of course, to try wearing the device with your glasses on normally, without a spacer. While this may work for some people, keep in mind it will eventually press the side of the frames into your head enough that it will become painful.
8. Defective or Dirty Lenses
Believe it or not, there are cases where you purchase an Oculus Quest 2—and this is definitely more common through the mail, where the package can get bounced around—and you end up getting one with defective lenses.
If you have tried everything else above and it still hasn’t resolved the blurriness, then it is highly likely that you have a defective lens or lenses. Feel free to check out the video below, so you can see what you want to look for.
Otherwise, you can always try cleaning your lenses as well. Of course, that doesn’t mean hosing the inside down using tile cleaner with bleach. All you want to use is microfiber cloth, without any chemicals, water, detergents, or any other cleaning agent, whatsoever.
Start from the center of the lens and wipe in circular motions outward until you reach the edges of each lens. Hold it up to the light as best you can to ensure that you get any remaining dust or smudges off the glass.
Oculus Quest 2 Warranty
If you’re dealing with defective lenses, not to worry. The warranty that comes with all Oculus devices is 2-years. So unless you let the thing sit in a box for over two years before you decide to try it out for the first time, you may be shipped a new device.
The warranty is a basic one, but it is tailored to those who receive an Oculus Quest 2 that is defective, which would include the lenses. So if you have defective lenses or anything else that’s wrong with the device when you receive it, you will be able to take advantage of their warranty.
All Things Considered
Oculus Quest 2 is designed to be an outstanding virtual reality experience, but that doesn’t mean it will look perfect, right out of the box, for everyone. If you experience blurry visuals when you play on the device, be sure to work your way through all of the above troubleshooting options.
Worst case scenario, you’ll have to send it back using the 2-year warranty that comes with the device. However, 99% of this common issue can be solved by a little troubleshooting and preventative maintenance.